
Introduction to Screen Printing Frames
Screen printing is a popular method for creating custom designs on various materials, including clothing, posters, and promotional items. The process relies heavily on the use of screen printing frames, which hold the mesh screen in place during printing. This article will provide a comprehensive guide to everything you need to know about screen printing frames, including types, sizes, preparation, techniques, and maintenance.
The Different Types of Screen Printing Frames
Wood Frames
Wood frames are the traditional choice for screen printing. They're often preferred by beginners because they're affordable and readily available. However, wood frames can warp over time due to moisture absorption, which can impact the quality of your prints. Additionally, they may not withstand the tension required for higher mesh counts.

Example of Wood Frames for Screen Printing
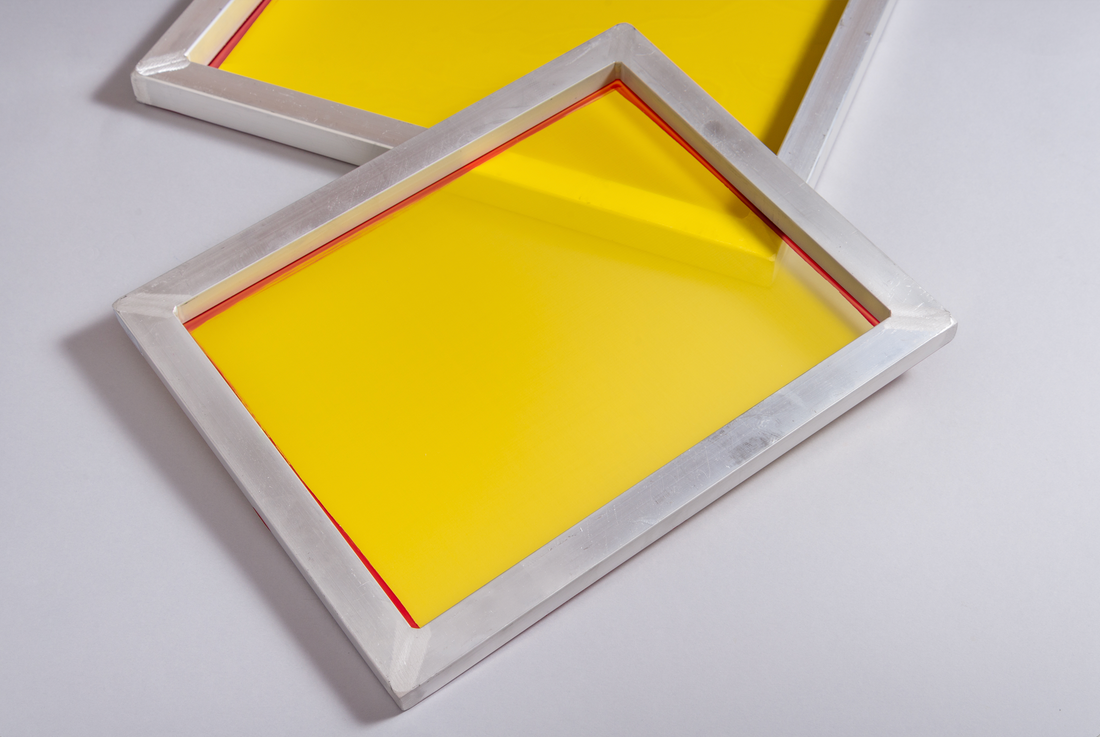
Aluminum Frames
Aluminum frames are a popular choice for professional screen printers. They're lightweight, durable, and resistant to warping, which makes them suitable for high-tension applications. While aluminum frames are more expensive than wood frames, they're an excellent long-term investment due to their increased durability.

Example of Aluminum Frames for Screen Printing
Retensionable Frames
Retensionable frames are a more advanced option for screen printing. These frames allow you to adjust the tension of the mesh screen, ensuring consistent print quality. They're ideal for high-volume printing jobs and can be used with a wide range of mesh counts. However, retensionable frames can be expensive and require more skill to use properly.

Example of Retensionable Frames for Screen Printing
Frame Sizes and Mesh Counts
Choosing the Right Frame Size
The frame size you choose depends on the dimensions of your design and the substrate you're printing on. It's important to select a frame that's large enough to accommodate your design but not so large that it becomes difficult to handle. As a general rule, the frame should be at least 2-3 inches larger than your design on all sides.
Understanding Mesh Counts
The mesh count of a screen printing frame refers to the number of threads per inch in the mesh. Higher mesh counts are better suited for detailed designs and finer inks, while lower mesh counts work well for simple designs and thicker inks. When selecting a mesh count, consider the level of detail in your design and the type of ink you'll be using. A good starting point for beginners is a mesh count of 110, which works well for most standard screen printing jobs.
How to Prepare Your Screen Printing Frame
Cleaning and Degreasing
Before applying emulsion to your screen printing frame, it's essential to clean and degrease the mesh. This step removes any dust, dirt, and oil that could interfere with the emulsion and negatively impact your print quality. Use a dedicated screen printing degreaser or a mild dish soap and a soft brush to gently clean the mesh. Rinse thoroughly with water and let the frame dry completely before proceeding.

Example of cleaning and degreasing a screen print frame
Applying Emulsion
Once your frame is clean and dry, you'll need to coat the mesh with a light-sensitive emulsion. The emulsion creates a stencil for your design and prevents ink from passing through the areas that should remain unprinted. Apply the emulsion evenly using a scoop coater, ensuring full coverage without overloading the screen. Allow the emulsion to dry in a dark environment before moving on to the next step.
Exposing the Screen
After the emulsion has dried, you'll need to expose your screen to UV light, which hardens the emulsion in the areas where your design is not present. To do this, place your printed transparency with your design on the mesh and expose it to UV light for the recommended amount of time. Once exposed, gently rinse the screen with water, and the unhardened emulsion will wash away, leaving a stencil of your design.
Printing Techniques
One-Color Printing
One-color printing is the simplest screen printing technique, requiring only a single screen and ink color. After your frame is prepared, place it on the substrate, ensuring proper registration. Pour a small amount of ink onto the screen and use a squeegee to evenly spread the ink across the design, ensuring that it passes through the mesh and onto the substrate. Carefully lift the frame and allow the print to dry.
Multi-Color Printing
Multi-color printing involves using multiple screens, each with a different color of ink. To achieve accurate registration, align the screens using registration marks on the transparencies. Print each color one at a time, allowing each layer to dry before proceeding to the next. This technique can create vibrant, complex designs but requires more skill and planning than one-color printing.
Four-Color Process Printing
Four-color process printing, also known as CMYK printing, uses four ink colors (cyan, magenta, yellow, and black) to create a full spectrum of colors. This technique requires precise registration and specialized software to separate your design into four color channels. The inks are applied in a specific order, and when combined, they create a wide range of hues and tones.
Maintaining Your Screen Printing Frames
Proper Storage
To prolong the life of your screen printing frames, store them in a clean, dry, and temperature-controlled environment. Avoid stacking frames directly on top of each other to prevent damage to the mesh.
Cleaning and Reclaiming
After each use, clean your screen printing frames by removing any excess ink and gently washing the mesh with water. To reclaim your screens for future use, use an emulsion remover to dissolve the hardened emulsion, then rinse the screen thoroughly and allow it to dry.

Conclusion
Screen printing frames are an essential component of the screen printing process. Understanding the different types of frames, selecting the right size and mesh count, and knowing how to properly prepare, use, and maintain your frames will help you achieve professional-quality prints. With practice and patience, you'll be on your way to creating stunning screen-printed designs that truly showcase your creativity.
Frequently Asked Questions
1. Can I reuse a screen printing frame?
Yes, screen printing frames can be reused multiple times. After each use, clean the frame by removing excess ink and washing the mesh with water. To reclaim the screen for a new design, use an emulsion remover to dissolve the hardened emulsion, rinse the screen thoroughly, and allow it to dry before applying a new layer of emulsion.
2. How do I choose the right mesh count for my screen printing frame?
The mesh count you choose depends on the level of detail in your design and the type of ink you'll be using. Higher mesh counts are better suited for detailed designs and finer inks, while lower mesh counts work well for simpler designs and thicker inks. A good starting point for beginners is a mesh count of 110, which works well for most standard screen printing jobs.
3. Can I use the same screen for multiple colors in a design?
While it's possible to use the same screen for multiple colors by cleaning the screen between colors, it's not recommended. Using separate screens for each color allows for more accurate registration and a cleaner final result. Multi-color printing techniques, such as multi-color printing and four-color process printing, rely on the use of multiple screens.
4. What type of frame material is best for screen printing?
Aluminum frames are the preferred choice for many professional screen printers because they're lightweight, durable, and resistant to warping. While wood frames are more affordable and accessible, they can warp over time and may not withstand the tension required for higher mesh counts. Retensionable frames offer the ability to adjust the tension of the mesh screen but can be expensive and require more skill to use properly.
5. How do I clean my screen printing frame after use?
After using your screen printing frame, remove any excess ink with a squeegee or spatula. Gently wash the mesh with water, using a soft brush if necessary to remove any remaining ink. To reclaim the screen for future use, apply an emulsion remover to dissolve the hardened emulsion, then rinse the screen thoroughly and allow it to dry completely.
Equipment
Unveiling the Best Screen Printing Machines for Beginners: Your Ultimate Guide
How to Choose the Right Screen Printing Press for Your Business: A Comprehensive Guide
The Ultimate Screen Printing Kit Buying Guide
Ink
A Beginner's Guide to Screen Printing Inks
Why Water-Based Screen Printing Ink is the Future
The Benefits of Using Discharge Screen Printing Ink
Screen
How to Choose the Right Screen Printing Mesh for Your Project
Everything You Need to Know About Screen Printing Frames
The Ultimate Guide to Screen Printing Emulsion
Technique
7 Essential Screen Printing Techniques for Beginners
How to Screen Print on Fabric: A Beginner's Guide
The Basics of Screen Printing on Paper
Service
Get Custom Screen Printing for Your Business or Event
Find Screen Printing Services Near You
The Best Online Screen Printing Services for Your Business
Supplies
The Essential Screen Printing Supplies You Need
How to Remove Screen Printing Ink from Your Screens
The Ultimate Guide to Screen Printing Squeegees